A great little command for auditing and troubleshooting purposes, it has to be run on your DC, it searches through the Security event logs on your server and prints out the results to a CSV.
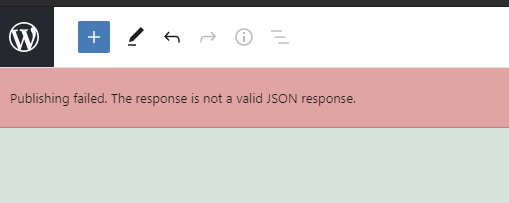
If you try to create a new page in WordPress and get the following error. “Publishing failed. The response is not a valid JSON response.”
You may be tempted to go down a path that’s code-related given the details in the error message. However, please check your web-server config first because this is likely an access control issue.
Please add this to your server’s config (Make sure you edit the path to match your docroot):
<Directory> /var/www/html/yoursitename/public_html> Options Indexes FollowSymLinks AllowOverride All Require all granted </Directory>
Notes on what this is actually doing:
FollowSymLinks means if a dir is a symbolic link, follow the link. Indexes mean a dir can be shown as a list if there is no index page. AllowOverride directive is used to allow the use of .htaccess within the webserver to allow overriding of the Apache config on a per-directory basis. Require all granted: No IP addresses blocked from accessing this service.
In my case, AllowOverride is what’s fixing the issue here. Hope this helps!
When I ran into this issue, I remember how frustrating it was to troubleshoot. So, I’m adding my solution here, hope it helps someone!
If you’re in a situation where you’re setting up a Windows domain-joined computer for remote access to a SMB share that is to be accessed through a VPN, you may run into a situation where Windows attempts to use the VPN session credentials to authenticate the SMB share/mapped drive connection and fails. You can verify this by opening Windows Credential Manager and deleting the session stored creds, you will notice that you’re now able to access your mapped drive.
This typically wouldn’t be a problem if the VPN was connecting to a Windows RRAS server on the same domain because the creds would be the same, or if your VPN server that is not RRAS authenticated users through LDAP for the said domain.
Now, that we have that out of the way, here’s the solution!
Under %AppData%\Microsoft\Network\Connections\Pbk you will find the VPN setttings file called rasphone.pbk, edit it with notepad and make these changes:
Right click on the VPN’s .pbk file and open it with Notepad. (Remember to untick ‘Always use this program for this file type’) Roughly 5 lines down will be an entry ‘UseRasCredentials=1’ Change this to ‘UseRasCredentials=0’ Save the file.
Now, your SMB share will authenticate with the stored creds once again!
Amazon doesn’t have a simple guide on how to do this so here we go!
First, you must download and install the AWS CLI for Windows, you can download that by clicking here.
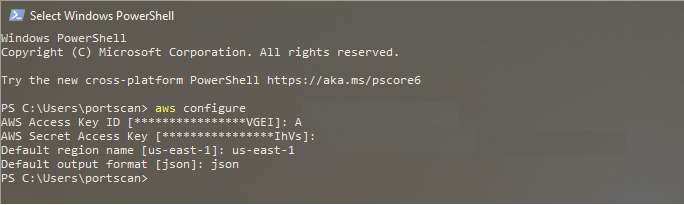
Once installed, you can open Windows Powershell or a Command Prompt and run the following commands to connect to your AWS account:
aws configure Access Key ID: Your Access ID Secret access key: Your Secret Access Key Default region name [None]: us-east-1 (or whatever region is your default) Default output format [None]: json
Should look something like this:
That’s it! Now you’re connected to your AWS environment and can run commands against it. As a note, you can find your Access ID and your secret access key under users in your IAM (Identity and Access Management).
Dell OpenManage Server Administrator does not have a built-in way to send email alerts if you don’t have an iDRAC system. This guide is a way for those systems to still send you alerts about the server hardware. If you have a system with an iDRAC, please use this guide:
If your system does not have an iDRAC or it’s not configured and you still want to get alerts through Openmanage then please follow this guide:
Requirements: -Dell Server with OpenManage Installed -Microsoft .Net Frameworks v2.0 (Download Here) -DellSMTPNotify Application (Download Here) -DellSMTPNotify Alert List (Download Here)
Installation – Part I: Extract files to C:\DellSMTPNotify Edit Config.xml and configure DefaultEventSettings to your SMTP server.
Now we are going to test the SMTP settings by running the script. Open command prompt and navigate to C:\DellSMTPNotify. Then type the following: “DellSMTPNotify.exe 1“. DellSMTPNotify associates numbers to messages. Looking at config.xml, you can customize the messages. In this case, “1” would send message “Message from server: Watchdog ASR”.
You should have received an email alert. If you didn’t receive an email, check your SMTP settings in config.xml.
Installation – Part II: Now that we have our DellSMTPNotify.exe working properly with our SMTP settings. We can now get it to work with Dell OpenManage. Login to Dell OpenManage and navigate to Alert Management
Under Alert Actions, select Watchdog ASR.
Under “Set Alert Actions for Watchdog ASR”, enable “Execute application.” In the whitebox, place the Abolute patch to DellSMTPNotify.exe with code to Watchdog ASR. The code for Watchdog ASR is 1, and would place the following “D:\DellSMTPNotify.exe 1“.
Now we have setup email alert for Watchdog ASR. We will have to do the same thing for the rest of the alerts.
A while ago I migrated a Windows Server running AD from bare-metal to HyperV using Disk2VHD, everything went without a hitch as it has always done, it’s a great little tool btw and has saved me so much time and hassle.
Fast-forward to a week later and I’m getting calls from the customer reporting that the time on their computers are off. Logged into the AD and ran a w32tm query command to check what NTP server it was synchronizing with (w32tm /query /status) and found that it was not syncing with any NTP server that I was familiar with:
I suspected that this may have something to do with the HyperV migration and was digging through the VM settings in HyperV and found a setting under Integration Services for Time synchronization that was enabled; it was causing the AD to sync to the HyperV host instead of the NTP server it was previously syncing with. So, step1 of the fix was to disable this setting:
Step2 was to set the AD to sync with a NTP server again, Microsoft has a guide on how to do this here: